MIDI THRU Blues
An Infernal Little tool Indispensable to its Master
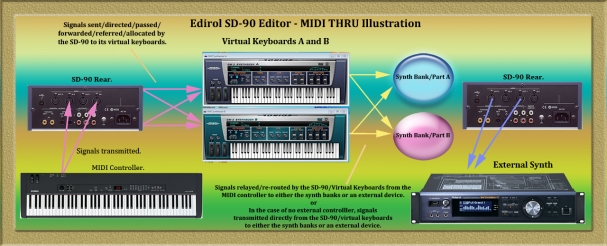
A software tool is enclosed to manage messages between the SD-90’s twin terminals and following an entire afternoon of making a puzzle out of a crises, I sought peace in documenting a slew of anomalies, lest the prospects of committing them to memory and erasing anything of emotional solace, remained but a fearful nightmare.
A Few Quick Quirks
The signals fed from a device connected to the physical MIDI input assigned to “in A” will control virtual keyboard “A” but no tone will be emitted even if one of the Sd90’s banks has been selected under the fields “OUT 1” or “OUT 2”
The signals fed from a device connected to the physical MIDI input assigned to “in B” will control virtual keyboard “B” but no tone will be emitted even if one of the Sd90’s banks has been selected under the fields “OUT 1” or “OUT 2”
If the same device is nominated for both inputs, input one takes priority until the next restart unless “in A” was left blank during the previous start-up in which case, the reverse is true”.
The signals fed from a device connected to the physical MIDI input designated under “External Devices” will control virtual keyboards A or B depending on whether “OUT A” or “OUT B” has been defined as the “MIDI THRU” port.
Both the “OUT” The fields are not numbered though for the purposes of this guide the top most will be always referred to as “OUT 1” and the bottom, “OUT 2”. Receptively, they refer to virtual keyboards “A and B”
The device assigned to “OUT 1” will be controlled by pressing keys on keyboard “A”
The device assigned to “OUT 2” will be controlled by pressing keys on keyboard “B”
If the same device is selected for both outputs, output 1 takes priority until the next restart unless “OUT 1″ was left blank during the previous startup, in which case the reverse is true”.
Commanding your Ranks.
If devices are present on one or both of the SD-90s MIDI outputs, there are several ways of designating their orders:
Scenario 1. I want to control one or both of SD-90’s internal tone banks (A and/or B) but have no external controller.
1. Select either of the synthesiser’s banks, referred to as “SD-90 PART A and SD-90 PART B” under “OUT” 1 or 2.
Remember “OUT 1” refers to virtual keyboard A and “OUT 2” refers to virtual keyboard B and the value “SD-90 PART A/B” selected under each defines which of the two banks any data generated by these keyboards is internally transmitted to.
If you want to use both banks, you should select “SD-90 Part A” for “OUT 1” and “SD-90 Part B ” for “OUT 2. Do not select the same bank under both fields.
When using only one bank, it is advisable to leave the “OUT” you do not wish to use blank.
2. Use the corresponding virtual synthesizer to invoke the some SD sorcery.
Scenario 2. I want to use the SD-90 to control one or two external synthesisers/sequencers.
1: Select either of the SD-90’s outputs under “OUT” 1 or 2.
Remember “OUT 1” refers to virtual keyboard A and “OUT 2” refers to virtual keyboard B and the value “SD-90 MIDI OUT 1/2” selected under each defines which of the two actual outputs on the back of the unit any data generated by these keyboards is transmitted to.
If you have two devices, you should select “SD-90 MIDI OUT 1” for “OUT 1” and “SD-90 MIDI OUT 2” for “OUT 2, do not select the same output under both fields.
With only one device connected, it is advisable to leave the “OUT” you do not wish to use blank.
2. Use the corresponding virtual synthesizer to control the connected device(s).
Before proceeding any further, it is important to understand the difference between the terms relay and re-route.
Relay is the expression used to describe when a signal being received by either input is sent to it’s corresponding bank/part or output (input 1 to either Part A or OUT 1 and input 2 to either Bank B or OUT 2), while re-route denotes when a signal being received by either input is sent to its opposing bank/part or output (input 1 to either Part B or OUT 2 and input 2 to either Part A or OUT 1). Note also that only this application permits the SD90 to receive data on one input and internally re-route it to the alternate output. This is NOT possible via the “MIDI IN THRU” function, which only endorses a signal flow from an input to its associated output.
Scenario 3. I want to control one or both of SD-90’s internal tone banks (A and/or B) using an external controller.
1. Connect a MIDI control surface to one of the SD-90s rear MIDI inputs and ensure “MIDI THRU IN 1 or 2” is disabled on the port(s) you have chosen.
2. In the software tool and under “external devices”, define which of SD-90s physical inputs your control surface is connected to.
If your controller is connected to input one, you should select “SD-90 MIDI IN 1″
If your controller is connected to input two, you should select “SD-90 MIDI IN 2″
3: Under either “OUT 1 or “OUT 2”, select one of the SD-90’s banks, referred to as “SD-90 PART A and SD-90 PART B”.
If you wish to use Bank/Part A, you should specify “SD-90 Part A” for “OUT 1”
If you wish to use Bank/Part B, you should specify “SD-90 Part B” for “OUT 2”
If you want to use both banks, you should select “SD-90 Part A” for “OUT 1” and “SD-90 Part B ” for “OUT 2. Do not select the same bank under both fields.
When using only one bank, it is advisable to leave the “OUT” you do not wish to use blank.
4. Use “THRU Port A/B setting” under external devices to determine your choice of virtual keyboard and of which of the SD-90s banks to allocate, then relay or re-route the signals transmitted by the controller to.
Selecting A will pass the signals to virtual keyboard A, which then relays or re-routes them to bank/part A, while B will refer them to keyboard B, which then relays or re-routes them to bank/part B.
5. Use the connected controller to parade the SDs pride and joy.
Scenario 4. I want to control one or a two synthesisers/sequencers via the SD-90 using an external controller.
1. Connect a MIDI control surface to one of the SD-90s rear MIDI inputs and ensure “MIDI THRU IN 1 or 2” is disabled on the port(s) you have chosen.
2. Connect the device you wish to control to the corresponding or both outputs.
3: In the software tool and under “external devices”, define which of SD-90s physical inputs your control surface is connected to.
If your controller is connected to input one, you should select “SD-90 MIDI IN 1″
If your controller is connected to input two, you should select “SD-90 MIDI IN 2″
4: Under either “OUT 1 or “OUT 2”, select one of the SD-90’s outputs.
If you have device connected to output one, you should specify “SD-90 MIDI OUT 1” for “OUT 1”
If you have device connected to output two, you should specify “SD-90 MIDI OUT 2” for “OUT 2.
If you have device connected to both outputs, you should specify “SD-90 MIDI OUT 1” for “OUT 1” and “SD-90 MIDI OUT 2” for “OUT 2. Do not select the same output under both fields.
With only one device connected, it is advisable to leave the “OUT” you do not wish to use blank.
5: Use “THRU Port A/B setting” under external devices to determine your choice of virtual keyboard and of which physical output to allocate, then relay or re-route the signals transmitted from the controller to.
Selecting A will direct the data to virtual keyboard A, then relay or re-route it to the device present on output 1, while B will forward it to virtual keyboard B, then relay or re-route it to any device present on output 2.
* Note that the “MIDI THRU port setting” will not relay or re-route any messages to the SD-90’s internal banks and/or the SD-90 physical outputs unless either or both have been defined as in step 3 of scenario 3 and/or step 4 of scenario 4.
Scenario 5. I want to control one or both of SD-90’s internal tone banks (A and/or B) using an external controller AND re-route all MIDI signals to an external synthesiser or sequencer.
1. Connect a MIDI control surface to one of the SD-90s rear MIDI inputs and ensure “MIDI THRU IN 1 or 2” is enabled on the port you have chosen.
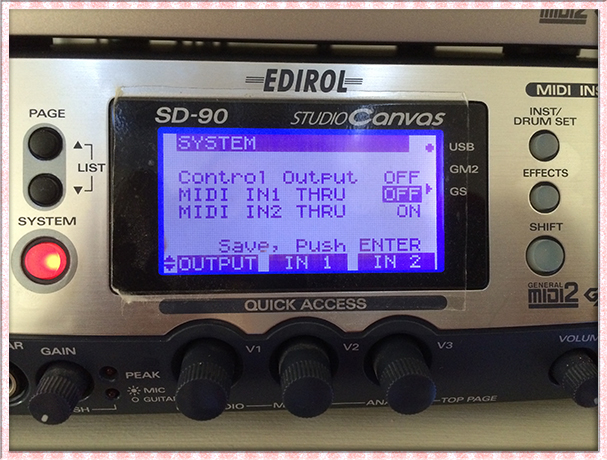
2. Connect the device you wish to control to the corresponding output.
3. Under “external devices”, define which of SD-90s physical inputs your control surface is connected to.
If your controller is connected to input one, you should select “SD-90 MIDI IN 1″
If your controller is connected to input two, you should select “SD-90 MIDI IN 2″
4: Under either “OUT 1 or “OUT 2”, select one of the SD-90’s banks, referred to as “SD-90 PART A and SD-90 PART B”.
If you wish to use Bank/Part A, you should specify “SD-90 Part A” for “OUT 1”
If you wish to use Bank/Part B, you should specify “SD-90 Part B” for “OUT 2”
If you want to use both banks, you should select “SD-90 Part A” for “OUT 1” and “SD-90 Part B ” for “OUT 2. Do not select the same bank under both fields.
5. Use “THRU Port A/B setting” under external devices to determine your choice of virtual keyboard and of which of the SD-90s banks to allocate, then relay or re-route the signals transmitted from the controller to.
Selecting A will refer the signals to virtual keyboard A, then relay or re-route them bank/part A, while B will direct them to keyboard B, then relay or re-route them bank/part B.
6. Use the connected controller to experience a strangely satisfying cacophony.
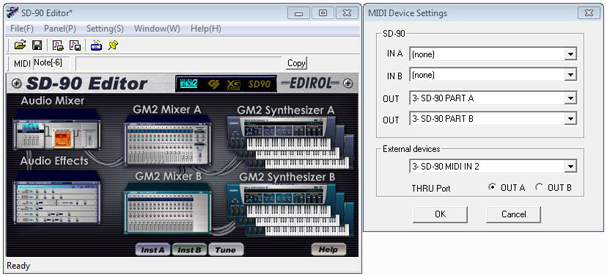
In the case above.
1: The control surface has been connected to the SD-90s second input “SD-90 MIDI IN 2.
2: Selecting THRU Port A will send the signals to virtual keyboard A, then re-route them to “Bank/Part A” in the SD-90 AND to the device present on output 2.
3: Selecting THRU Port B will forward the signals to virtual keyboard B, then relay them “Bank/Part B” in the SD-90 AND to the device present on output 2.
The “MIDI THRU port setting” in this instance will only dictate which of the the virtual keyboards and which internal synth bank (part A or B) receives messages from the controller connected in step one and its input, as defined under external devices in step three.
It has no effect on which physical output on the SD-90 any data flows to since this has already been determined by enabling “MIDI IN THRU 2” in step 1 hence, output 2 will always re-broadcast any data received by input 2, even when the application is closed.
Twice Two
Scenario 6. I want to control one or both of SD-90’s internal tone banks (A and/or B) using two external controllers AND re-route all MIDI signals to a pair of external sequencers or synthesisers.
This is not fully supported by the tool, though the closest one get is:
1. Connect the control surfaces to each of SD-90s rear inputs and ensure “MIDI THRU IN 1 or 2” is enabled on both ports.
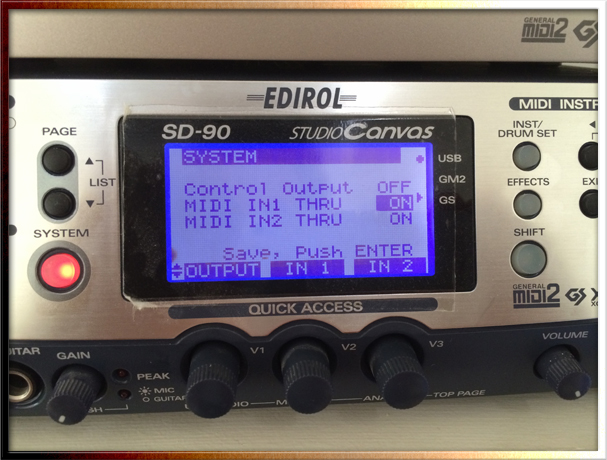
2. Connect the devices you wish to control to each of SD-90s rear outputs.
3. Under “external devices”, select one of SD-90s inputs, depending on which controller you want the application to receive messages from:
If you want the tool to accept data from the controller that is connected to input one, you should select “SD-90 MIDI IN 1″
If you want the tool to accept data from the controller that is connected to input two, you should select “SD-90 MIDI IN 2″
As you’ll note, this has to be a decision since only one input at a time is definable.
4. Repeat steps 4 through 6 of scenario 5.
Both sets of controllers and devices can be used simultaneously but data transmitted from the controller connected to the input that has not been specified under “external devices” in step 3 CANNOT relayed or re-routed to the SD-90s tone generators as it is never detected/seen by the application and will simply be forwarded to the device connected to the corresponding output.
As before, the “MIDI THRU port setting” in this instance will only dictate which of the the virtual keyboards and which internal synth bank (part A or B) receives messages from the controller connected in step one and its input, as defined under external devices in step three.
It has no effect on which physical output on the SD-90 any data flows to since this has already been determined by enabling both “MIDI IN THRU 1 and 2” in step 1 hence, both outputs 1 and 2 will always re-broadcast any data received by their respective inputs, even when the application is closed.
To all whose restless souls depend on wrenching redemption from a tunnel THRU the ninth port of hell, I would ardently urge your quick and painless surrender to the intuitive simplicity of standalone MIDI mode…consult Scenario 8 and breath once more.
Mixing and Matching
Scenario 7: You can also combine any of the above scenarios depending on your needs to control either the SD-90s mellifluous minions and/or an external MIDI device.
For instance:
1. Connect a MIDI control surface to one of the SD-90s rear MIDI inputs and ensure “MIDI THRU IN 1 or 2” is disabled on the port(s) you have chosen.
2. Connect a device you wish to control to the corresponding output.
3. under “external devices”, define which of SD-90s physical inputs your control surface is connected to.
If your controller is connected to input one, you should select “SD-90 MIDI IN 1″
If your controller is connected to input two, you should select “SD-90 MIDI IN 2″
4: Under either “OUT 1 or “OUT 2”, select one of the SD-90’s outputs.
If you have device connected to output one, you should specify “SD-90 MIDI OUT 1” for “OUT 1”
If you have device connected to output two, you should specify “SD-90 MIDI OUT 2” for “OUT 2.
5: Under either “OUT 1 or “OUT 2”, select one of the SD-90’s banks, referred to as “SD-90 PART A and SD-90 PART B”.
If you wish to use Bank/Part A, you should specify “SD-90 Part A” for “OUT 1”
If you wish to use Bank/Part B, you should specify “SD-90 Part B” for “OUT 2”
This selection should be for whichever “OUT” you did not did NOT use in step 4.
6: Use “THRU Port A/B setting” under external devices to determine your choice of virtual keyboard to refer the signals transmitted from the controller to and consequently whether the signals are relayed or re-routed to either one of the SD-90’s internal Parts/Blocks, as defined in step 5, or to the physical output you defined in step 4 and hence the external device you connected in step 2.
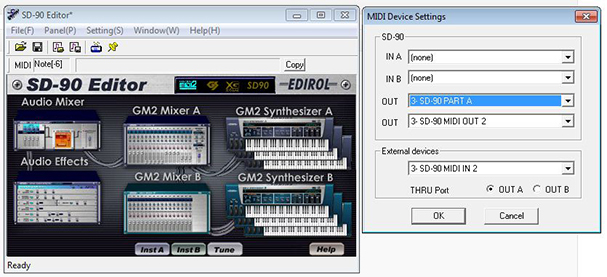
In the case above.
1: The control surface has been connected to the SD-90s second input “SD-90 MIDI IN 2.
2: Selecting THRU Port A will pass the signals to virtual keyboard A, then re-route them to “Bank/Part A” in the SD-90.
3: Selecting THRU Port B will direct them to virtual keyboard B, then relay them to the device present on output 2.
Scenario 8: I have an external controller or two and a couple of synthesisers/sequencers but no computer, I wish to replicate scenario 5.
1. Switch the SD-90 to midi mode via the LCD menu.
2. Connect a MIDI control surface to one or both of the SD-90s rear MIDI inputs and ensure “MIDI THRU IN 1 or 2” is enabled on the port(s) you have chosen.
3. Connect the device(s) you wish to control to the corresponding or both outputs, then use the control surface(s) to commandeer your chorus line.
Signals travelling from the controller wired to input one will be received by “bank A” and forwarded to the hardware present on output 1 while data sent from the controller connected to input two will be received by “bank A” and passed onto the synthesiser or sequencer present on output 2.
With this method, using the application to configure anything specific isn’t required and functionality should be identical to USB mode.
Turning “MIDI IN THRU” off on either input will ensure signals are only recognised by the internal tone bank(s) and prevent them from being cloned to the related output.
Potential MIDI THRU Vexation
The “MIDI IN THRU 1/2” function accessible via SD-90s LCD operates independently of the “MIDI THRU” port A/B option in the software tool. Hence, depending on which of the SD-90s physical inputs and outputs your control surface and synthesiser or sequencer occupy, it is important that you verify the “Thru port” you select (A or B) does not correspond to both the unit’s physical output selected for “OUT 1” or “OUT 2” AND the input designated under “External Devices” IF The “MIDI IN THRU” function has been enabled on the same input as allocated in the previous instance.
This is tantamount to enabling MIDI THRU twice and would issue a “double” signal to any device present on the output in question, once inside the software tool via the THRU port setting and physical output defined under “OUT 1” or “OUT 2” and again outside the tool by virtue of the unit’s “MIDI IN THRU” setting. To address this complication, please see below.
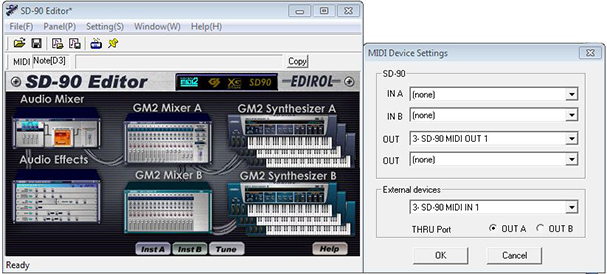
Example 1. If…
1: You have a synthesiser or sequencer connected output one on the SD-90 and a controller connected to input one.
2: You Select “SD-90 MIDI IN 1” under “external devices”, which will ensure the data transmitted from a control surface connected to input one can be received.
3: You set the thru port to “OUT A”, which will allocate any signal passing into the unit from the control surface to virtual keyboard A.
4: You Select “SD-90 MIDI OUT 1” under “OUT 1” (virtual keyboard A), which will ensure signals received by virtual keyboard A are relayed to any synthesiser or sequencer present on output 1.
5: You set “MIDI IN 1 THRU” on the SD-90 to “ON”.
Example 2: Or…
1: You have a synthesiser or sequencer connected output one on the SD-90 and a controller connected to input one.
2: You Select “SD-90 MIDI IN 1” under “external devices”, which will ensure the data transmitted from a control surface connected to input one can be received.
3: You set the thru port to “OUT B”, which will allocate any signal passing into the unit from the control surface to virtual keyboard B.
4: You Select “SD-90 MIDI OUT 1” under “OUT 2” (virtual keyboard B), which will ensure signals received by virtual keyboard B are relayed to any synthesiser or sequencer present on output 1.
5: You set “MIDI IN 1 THRU” on the SD-90 to “ON”
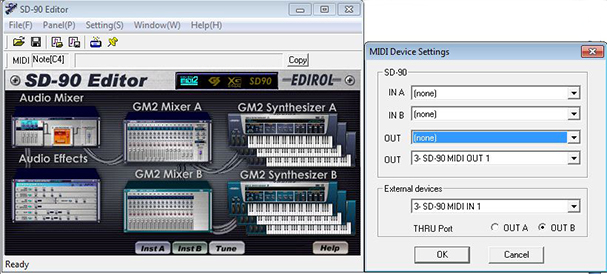
Any device connected to output one will receive two identical signals, the first relayed from your controller by virtual keyboard A/B (A in example 1, B in example 2) and the second due to “MIDI IN THRU 1” being enabled and passing the same data from your controller directly to the device. As a consequence, the resultant sound may be adversely effected.
To ensure this does not happen.
Either:
1: Turn off the “MIDI IN THRU” function on the input the controller is connected to – in this case you’d set “MIDI IN 1 THRU” to “OFF”.
This solution works because it stops the direct flow of signals from the input to its corresponding output and leaves only those relayed to that output and its resident device by the virtual keyboards in the software tool.
2: Select the opposing “THRU Port” to the “OUT” you chose in step 4 of either of the above scenarios under external devices in the software tool. In Example 1, you’d select “OUT B” and example 2, “OUT A”.
This solution works because it directs the signals received by the software tool to the virtual keyboard that has no designated output, thus preventing them from being relayed to the output your device is connected to and declaring nothing to re-route them to. This leaves only the direct flow of data to that output and device made possible by enabling “MIDI IN THRU 1/2”.
In this particular context, it is akin to closing the application altogether.
3: Move your controller over to the other input and modify your selection in the application accordingly. In both examples 1 and 2 you would connect your controller to input 2 on the SD-90 and select “SD-90 MIDI IN 2” under “external devices”.
This solution works because it enforces the same results as those brought about by solution 1. As the controller is now connected to the alternate input, there are no longer any signals being received by the original input and hence, no direct flow of data to its corresponding output regardless of the unit’s “MIDI IN THRU” setting.
The synthesiser will now only garner data that has been received by the software tool from the alternate input, passed on to a virtual keyboard via its THRU PORT setting and then re-routed to the output it is connected to.
Example 3. If…
1: You have a controller connected to input one on the SD-90 and a synthesiser or sequencer connected to both of the SD-90s outputs.
2: You Select “SD-90 MIDI IN 1” under “external devices”, which will ensure the data transmitted from a control surface connected to input one can be received.
3: You set the thru port to “OUT A”, which will allocate any signal passing into the unit from the control surface to virtual keyboard A.
4: The “MIDI output” defined under either “out 1” or “out 2” (virtual keyboard A/B) does not correspond to the MIDI input allocated in step two – in this scenario, you would have selected “SD-90 MIDI OUT 2” for “OUT 1”.
5: You set “MIDI IN 1 THRU” on the SD-90 to “ON”
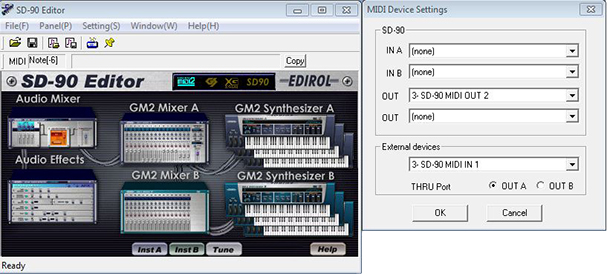
Example 4. Or…
1: You have a controller connected to input one on the SD-90 and a synthesiser or sequencer connected to both SD-90s outputs.
2: You Select “SD-90 MIDI IN 1” under “external devices”, which will ensure the data transmitted from a control surface connected to input one can be received.
3: You set the thru port to “OUT B”, which will allocate any signal passing into the unit from the control surface to virtual keyboard B.
4: The “MIDI output” defined under either “out 1” or “out 2” (virtual keyboard A/B) does not correspond to the MIDI input allocated in step two – in this scenario, you would have selected “SD-90 MIDI OUT 2” for “OUT 2”.
5: You set “MIDI IN 1 THRU” on the SD-90 to “ON”
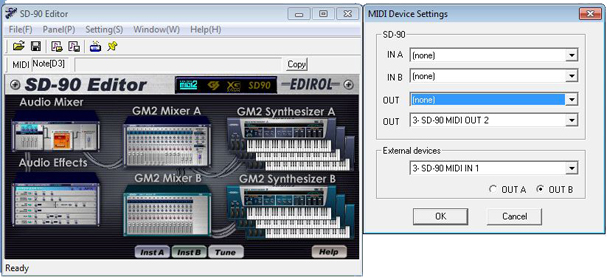
Both connected synthesisers will receive data transmitted from the controller present on input one and emit sounds simultaneously.
The device on output two would obtain data re-routed by the software tool and virtual keyboard B – defined above under “OUT 1” in example 3 and “OUT 2” in example 4 – while enabling “MIDI IN THRU 1” would forward the same signals from the controller directly to the synthesiser present on output 1.
To ensure this does not happen.
1: Disable the “MIDI IN THRU” function on the input the controller is connected to – in both examples 3 and 4, you’d set “MIDI IN 1 THRU” to “OFF”.
2: In the software tool, select “SD-90 MIDI OUT 1” for “OUT 1” and “SD-90 MIDI OUT 2” for “OUT 2.
3: Use “THRU Port A/B setting” under external devices to determine which of your connected beloveds receives messages emanating from the controller .
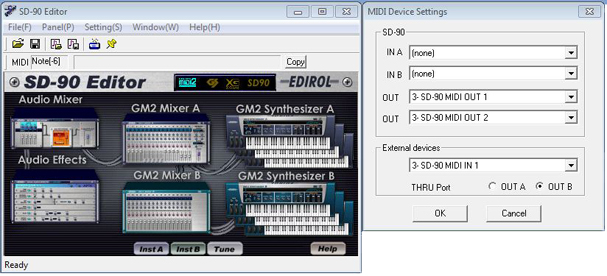
In this case, the program’s “THRU port” setting is intended to replace the “MIDI IN THRU” function on the unit.
Selecting Thru Port “OUT A” will send signals received by the input 1 to virtual keyboard A, then relay them to to the device present on output 1,
Selecting Thru Port “OUT B” will direct data received by the input 1 to virtual keyboard B, then re-route them to the device present on output 2.
You can also use the program to send and receive data directly to and from devices other than the SD-90, provided the unit itself remains connected to the host.
With this method one can harness the USB protocol to field MIDI messages, assuming the hardware supports it. I’m not writing any more about this application…had enough…really…I never meant for what started in earnest as a simple aid memiore for all concerned to evolve into a shadow of the thesis it became. Yes, I know there are other countless combinations of settings. Please run rampant, pic n mix to your heart’s content, have fun. I grow weary of recycling technical rhetoric and wishful of fragrant Earl Grey.


