Roland Integra 7
A Sneerer and Sniper May Say.
HA! So you have twelve sparkling SRX smorgasbords, six seductive Super Natural symphonies and a gleaming gamut of GM2 grandeur…out of which only a quartet can be assembled. No, wait, it’s worse, choose the General MIDI banks and you populate all four virtual slots.
Sure, neither the Fantom or XV dealt a card of courtesy, but when all slots were spoken for, six in the Fantom, eight in the XV, the whole heaving humming, heavenly, harvest of transcendent tonology awaited your eager ears.
Why, where’s the logic? DRAM is dirt cheap, simply shove in a couple of extra DIMMS and have all twelve freely accessible the very instant you press for action? Instead, we’re stuck with an exasperating five second pause every time we want to switch boards.
We have different projects in Cakewalk and Cubase that use a ton of combinations, now we have to keep a militant record of which boards relate to each before lending the closing bars of that masterful melody our undivided attention. What a missed opportunity. The minutes, the hours, the days saved for leisure and pleasure would’ve sealed a deluge of deals.
One Final Little Tool
Well, to ease the pain a touch, there exists a software editor, freely downloadable from Roland’s website and installed in a contemporary VST compatible application such as Cakewalk Sonar or Steinberg Cubase whereupon it is detected as a “VST 3” soft synth.
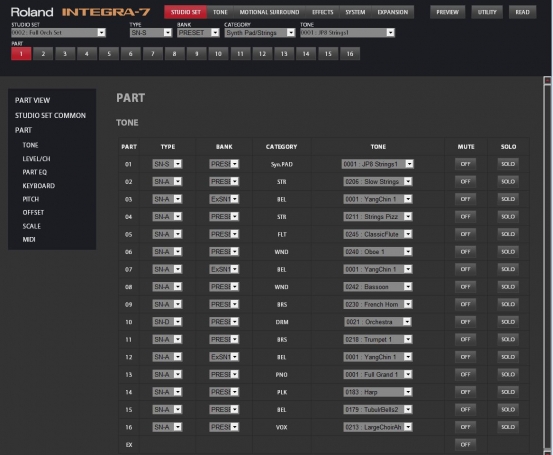
Having never curated Cubase I’ve no knowledge to impart but in Sonar, the user “inserts” it as one would a standard plugin, prompting the creation of a track and the tool’s appearance in the synth rack. A double click reveals its interface, which affords quick and satisfying interaction with the Integra’s catalogue of functions. From here, clicking “Utility” (top right) then “Device” (left, third up from bottom) presents us with the menu to determine input and output devices.
The selection here is vital and conducive to avoiding niggles I resolved via my usual “guess and press” approach. It must be “Integra-7 CTRL” under BOTH fields and not “Integra-7” or any other option you might have listed.
Moving on, a tap on “READ” will deliver all the data from the Integra to the application’s menus where every one of its plentiful settings could be modified with with the same forensic precision as on the unit but via an infinity more familiar and practical protocol of point, click and drag!
Instrument definition for every part along with its full complement of customisable characteristics. Individual screens for each category of effects, including Motional Surround, MFX, Chorus, Reverb, Master and Comp+EQ and all their tunable trinkets and extra over for Part EQ gains, pitch shift with coarse and fine tuning. Part offset, scale adjustment, key, pan and level governance. Chorus and reverb send levels and output designation, all laid out in a spreadsheet style and accessible “at a glance”.
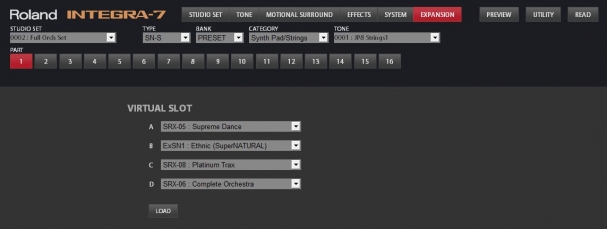
Last but not least, a special menu for loading and ejecting all nineteen SRX and SN expansion modules to and from the Integra’s modest quadrilogy of virtual slots.
The lions share of alterations commanded by the user are reflected immediately, even though the LCD isn’t synchronised with the GUI. Dragging a slider or clicking an applet will cause the USB activity LED to flicker, indicating changes are being committed.
In closing, its worth alluding to the Integra’s reliance on a propriety “Studio Set” template system.
Studio sets are best described as giant portfolios of pre-sets administrable to the machine by way of a single click. Housed within each is data applicable to every feature cited above and all those left to chance-and there are hundreds of them!
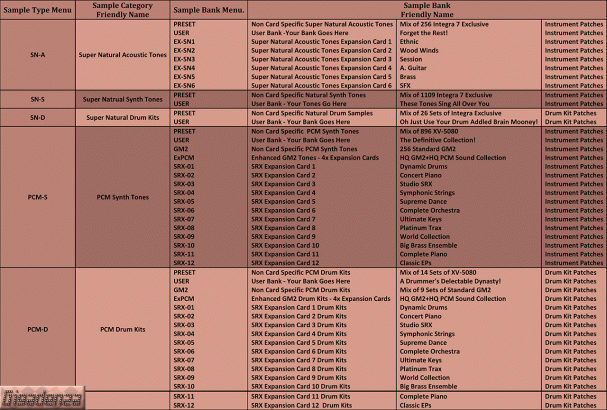
Out of the box, there are sixteen pre-programmed studio sets and accommodation for 47 user defined templates. Pre-assembled sets also contain space for user data. For example, in each set, all samples are categorised on a hierarchical basis. At the top end, after the studio set itself has been initiated, one specifies an option from the “TYPE” menu, determining the sample sub-group.
Next in the chain is the “BANK” menu, the options Displayed here are influenced both by your selection above under “TYPE” and the expansion cards you have loaded in the four virtual bays. The table below illustrates the correlation between “Banks” and “Types” and how their abbreviated names when listed under each menu, correspond to those written in proper English.
Two choices are always present “USER” and “PRESET”. “PRESET” refers to the uncategorised drum and instrument patches native to the Integra as well as those from the XV-5080 and “USER” to a Carte Blanche awaiting your input. Clicking on “UTILITY” provides us a patch designation screen where every instrument and drum kit can be nominated from the remaining two menus in the hierarchy, “CATEGORY” AND “TONE and take up its place in the bank by clicking the “write” button next to the desired patch number, thus generating a brand new “USER” bank, in my case….very slowly.
Should you have the need, or indeed the patience to stitch an entire Studio Set from scratch, it can be stored and deployed to the Integra in two shakes of an index finger.
In use general use, navigation is a trifle clunky, load times could be snappier and the menus themselves are decidedly drab when compared to the polished graphical mixers offered by the Fantom XR’s and SD-90’s edifying editors. Nevertheless, the experience of tweaking, tuning, teasing and trimming every meaningful attribute this samplicious sage bestows with sensitive sliders on a 4k display beats burdensome button bashing boredom, however luminous the LCD.
An Epilogue THRU MIDI
Please don’t read this if you’ve already sampled the Fantom’s menacing “MIDI THRU Prelude”, the similarity is quite terrifying.
If the option “USB MIDI Thru” is set to enabled, when the unit receives a MIDI signal either directly through its MIDI input or via that of another USB device connected to the same computer, such as an additional synthesiser or MIDI I/O adapter, the Integra’s MIDI 1 output will behave exactly like a conventional MIDI THRU port and re-broadcast these signals to any device that is connected to it.
However, this will only be possible when a program that fully utilizes the Integra’s USB driver and that of the other device – if applicable – is running. Prime examples would be sequencing software such as Sonar, Cubase and Logic.
The function will also enable the MIDI OUTPUT to relay data that originates from internal transmissions, such as those generated when a MIDI recording is played back in one of the above applications on tracks to which the Integra’s instruments have been allocated, or that occur when a MIDI file is opened up in utilities like QuickTime or Media player and the Integra has been specified as the OS’s default MIDI device.
When this feature is enabled, the unit will be able to play back tones and simultaneously forward the data to its midi output but will remain silent in standalone mode when receiving signals from an external controller.
By contrast, the MIDI THRU port will never forward internal playback signals, but will always duplicate those received by the Integra’s MIDI input to a connected device, regardless of whether or not USB MIDI thru is active.


